
Estimated reading time: 12 minutes
Identifying a gemstone is a bit like solving a mystery (or playing a game of guess who for those of you old enough to remember that one). You gather clues, rule things out, and slowly narrow it down until you’re left with the answer. But we don’t need to run every possible test on every stone. The real skill is knowing what to test next so the process stays quick and efficient.
If you’ve ever wondered how gemologists actually identify stones, this is the process I personally use.
Jump to:
My Gemstone Testing Workflow
When I’m testing a gemstone, I don’t follow a strict textbook order. Instead, I begin with the quickest and easiest tests, even if they’re usually considered supporting results. The reason for this is simple. The more information I gather early on, the faster I can narrow down the list of possible gemstones.
Here’s what my gem testing work flow looks like:
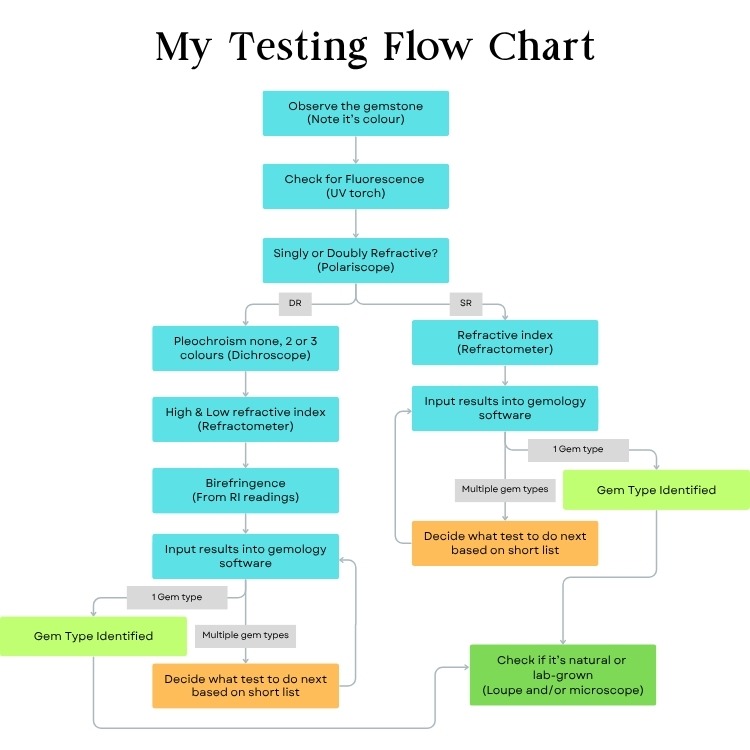
This isn’t the only way to test gemstones, but it’s the method I’ve found to be the most efficient for me.
Step-by-Step: The Core Tests I Always Start With
First Impressions
Before I even reach for any tools, I take a moment to look at the gemstone.
I’m checking:
- Colour
- Transparency
- Colour zoning or patchiness
- Whether anything looks slightly “off”, particularly when viewing the gem from the side.
I then examine it under two different light sources. First, an incandescent light, to check for any colour change. Then I place the gem on an LED flat light (the type I use is actually an LED sad therapy lamp set to white light instead of yellow). I use a portable polariscope, so this light sits on my desk all the time (it’s also the one I use for the backlit photos in my listings).
This light helps reveal uneven colour, zoning, or patchy areas. In some cases, it can even indicate colour coating or dye without needing magnification. It’s a small step, but it’s one I use all the time.
Fluorescence
I tend to check fluorescence next, although I know many people only use it as an additional test when needed. It only takes a moment, and while it’s not always especially helpful, it gives me an extra data point when narrowing down possible gem types. It also means I don’t miss testing stones that wouldn’t normally be checked under UV light. For example, I woudln’t normally check blue sapphires, but some do glow red which can give an idea of where they might have been mined.
How to test it
UV light (longwave and shortwave)
Shine the UV light on the gem in a darkened area (I use a cardboard jewellery box) and observe how the gemstone reacts.
For example:
- Rubies often glow red under longwave UV
- Some diamonds glow blue
- Some synthetic spinels glow red or orange
Optical Character: Singly vs Doubly Refractive
This tells us whether light travels through a gemstone in one path or splits into two.
If I’m working through a large parcel of stones, I’ll often use this step to sort them into two more manageable groups. I then tend to start with the doubly refractive ones. Most gemstones are doubly refractive, whereas glass and cubic zirconia are singly refractive. By starting with the doubly refractive stones, I’m more likely to be identifying natural gemstones straight away, while singly refractive stones, such as spinel, are often mixed in with the less interesting imitations.
How to test it
Polariscope
Rotate the gemstone between two polarising filters:
- Doubly refractive (DR) stones blink light and dark
- Singly refractive (SR) stones stay dark
- Aggregate (AGG) materials stay light
Sometimes you’ll see a swirling or snake-like pattern. This often indicates single refraction, but not always, so I usually set those stones aside to double check on the refractometer later.
There is also something known as anomalous double refraction (ADR), where a gemstone appears to be doubly refractive in a polariscope but only shows a single RI reading, as it is actually singly refractive. This is quite common in garnets, although it is not unique to them.
While a refractometer can also be used to determine whether a stone is SR or DR, I still prefer the polariscope. It provides additional information, such as ADR, and can be used with a conoscope rod to determine a gemstone’s optical figure (covered under additional tests).
Refractometer
Doubly refractive stones will show two RI readings when the polarising filter is rotated, while a singly refractive stone will show only one.
Pleochroism
Some gemstones show different colours or tones when viewed from different directions. This is common in doubly refractive stones.
How to test it
Dichroscope
I use a London Dichroscope, which is a small handheld tool with two polarising filters set at right angles. To use it, place the gem on a light so it’s backlit (another use for the LED flat light), then hold the lens over the stone. In many gems, you’ll see two different colours or at least shades of the same colour.
I’d recommend rotating the gem to different angles, rather than just resting it on the table facet. This helps you check for a third colour and confirm whether pleochroism is truly absent in stones where only one colour is visible.
Naked eye
In stones like tanzanite or iolite, pleochroism is sometimes visible without tools. Simply view the gem from different angles to see the colour changes.
Refractive Index (RI)
Refractive index is one of the most reliable properties we can measure. I never identify a gemstone without checking its RI reading(s).
How to test it
Refractometer
Apply a drop of RI fluid and place the stone on the glass plate, then look through the eyepiece for the reading. While viewing the scale, rotate the polarising filter by 90° to check whether there are one or two readings, and to make sure you’re seeing both if present.
The easiest facet to test is the table, as it’s the largest and gemstones generally sit quite steadily on it. There are occasions, however, where you’ll need to use a different facet. This is especially useful if you suspect a stone may be a doublet, as testing both a pavilion facet and a crown facet can help confirm this.
Quick side note. A standard manual refractometer typically reads up to around 1.81, but some gemstones have refractive indices higher than this. Fortunately, many of these higher RI gemstones are singly refractive. If you work with them regularly, it may be worth using an electronic tester, such as the Presidium Refractive Index Meter II. It provides a single RI reading and tends to be more reliable at higher refractive index ranges. While it’s more limited than a traditional refractometer, it can be a useful addition when dealing with high RI materials.
Birefringence
Birefringence is the difference between the highest and lowest RI readings in a doubly refractive gemstone.
How to test it
Refractometer
Subtract the lowest RI from the highest. If you’re using gemology software, it will usually calculate this for you.
Narrowing Down the Possibilities
Once I’ve gathered these results, I enter them into my gemmology software (I use Gemology Tools Professional) to generate a shortlist of possible gemstones.
You can, of course, do this manually using a good reference book, such as Gemstones of the World by Walter Schumann, by looking up stones that match your results. This approach is more time-consuming, but it’s a more affordable option if you’re testing gemstones as a hobby or just checking the occasional stone.
Additional Tests (When Needed)
Sometimes the initial tests are enough to get an identification, others there are a few possible options. That’s when I move on to more specific tests.
Optic Figure
There are four extra elements to a doubly refractive gemstones optical character, but fully determining it is more time-consuming. Because of that, I tend to treat it as an additional test rather than something I carry out on every stone. The four optic figures are: uniaxial (+), uniaxial (−), biaxial (+), and biaxial (−).
How to test it
Polariscope with conoscope (quick method)
This is the method I use first, when practical.
When placing the gemstone in the polariscope, you may sometimes see a rainbow-like interference pattern. This indicates you are looking down the stone’s optical axis. In theory, you should always be able to position a gemstone to see this, but in practice it isn’t always easy, especially if it requires holding the stone at an awkward angle.
If I can find this interference easily, I place a conoscope rod between the gemstone and the top lens of the polariscope. This reveals a pattern that allows you to determine whether the stone is uniaxial or biaxial, and whether it is positive or negative.
Refractometer (more reliable, but slower)
If the polariscope method isn’t practical, I use the refractometer instead.
This involves taking multiple RI readings while rotating the gemstone through a full 360° and recording both the high and low values (typically around six pairs of readings). You then compare these values to see whether both the high and low readings change, only one changes, and which changes the most. This allows you to determine the full optical character of the stone.
Spectroscope Readings
Some gemstones absorb light in very specific ways, creating patterns that can help confirm identity.
How to test it
Handheld spectroscope
Ensuring the gemstone is position table up, and is well lit from behind, view it though a spectroscope. You’ll see the absorption lines on the colour spectrum and can compare them to known patterns.
Specific Gravity (SG)
Specific gravity measures how dense a gemstone is compared to water. It’s less commonly used for faceted stones, as it larger the specimin the more accurate it is, but still useful if you really can’t identify the stone from the other test results.
How to test it
Hydrostatic weighing
Weigh the gemstone in air and then when it’s suspended in water. By compairing both the weights you can calculate the stones SG.
Heavy liquids
Drop the gemstone into a liquid of known SG to see if it floats or sinks. This gives a rough estimate but requires care as many of the liquids used for these types of tests are toxic, so I’d recommend the method using scales.
Final Checks: Confirming What the Stone Really Is

Once I’ve identified a gemstone, I’m not quite finished yet. This is the stage where I take a closer look at the gem to see if it’s natural or lab-grown, and whether it’s been treated in any way.
Magnification
Magnification is one of the most useful tools at this stage. The internal and surface features of a gemstone can reveal a huge amount about how it formed and whether it’s been treated.
How to test it
10x loupe or microscope
I’m looking for:
- Inclusions that indicate whether a stone is natural or synthetic. Examples of the types of inclusions I look for are:
- Rutile needles in sapphire
- Curved growth lines in flame fusion stones
- Flux inclusions in synthetic emeralds
- Signs of heat treatment, such as altered or partially dissolved inclusions
- Dye concentration, often visible as stronger colour along fractures or in certain areas
- Colour coatings, which may appear uneven or sit on the surface rather than within the stone. You can sometimes see where the coating has rubbed away along facet joins as well which makes this really easy to spot.
- Fracture filling, such as in glass-filled rubies, where filled areas can look different under magnification and show flashes of oranges or blues.
Immersion Testing
Immersion is something I use when I want a clearer view of what’s going on inside a gemstone. It can be a bit messy if you’re using anything but water as you have to clean the gems up afterwards, but worth doing when something just doesn’t look right.
How to test it
Immersion in a liquid with a similar refractive index
Placing a gemstone in a liquid with a similar refractive index reduces surface reflections, making internal features and colour distribution much easier to see.
A simple way to understand this is to place a transparent quartz gem in a glass of water. The stone will appear to almost “disappear”, taking on a soft, jelly-like look. This makes inclusions much easier to see. It’s the same effect you notice with ice in water, where the boundaries become less visible but internal cracks stand out more clearly.
I use immersion regularly when testing sapphires and rubies, especially if something looks a bit off under magnification or when backlit. I mainly use it to catch stones that have been beryllium diffused. In stones that have been diffusion-treated, colour is often concentrated near the surface or along facet edges, while the centre may appear lighter or even a different colour.
It’s also useful for identifying fracture filling, as filled areas tend to stand out more clearly when the gemstone is immersed. This is especially true of gems that have been glass-filled as the glass doesn’t have the same refractive index as the gemstone.
🔗 If you want to dive deeper into identifying rubies? Read Real vs Fake Rubies
Side note: Many immersion kits use heavy liquids, which can be toxic. Personally, I prefer using essential oils. They smell better and, while they still need to be handled with care, they are a safer alternative. For sapphires, I use cinnamon bark oil. Its refractive index isn’t an exact match, but I find it’s close enough to give a clear view of internal features and colour distribution.
Quick Summary: The Tools I Use Most
If you’re new to gemstone testing, this might feel like a lot to take in. The good news is that you don’t need to get all the equipment (and learn how to use it) all at once.
These are the tools I reach for most often, and would suggest as a starter kit:
- Polariscope
- Refractometer
- London Dichroscope
- Loupe (10x) and microscope (one that goes up to 100x)
- UV light (even just a LW UV torch is super helpful)
- LED flat Light
Over time, you start to combine results from multiple tools without even thinking about it. That’s when gemstone identification really starts to feel natural.
Final Thoughts
Gemstone identification is both a science and a skill you build over time. The more you practice, the easier it becomes to choose the right tests and reach an answer efficiently. If you’re testing gemstones at home, a small gemology kit and a good reference program or book can take you a long way. And remember, if something doesn’t quite add up, test it again. There are some really good fakes out there after all.
📌 Don’t forget to save this Gemstone Identification work flow so you can find it again!
